A reader left a comment – she’s fairly new to stitching and asked some questions so I thought I would answer them here instead of writing a very long comment.
Remember that I’ve only been stitching just a little over three years. I’m fairly self-taught so there’s a lot I do not know (or think I know and am wrong!). I will try to cover not only the questions asked but also the questions I had when I first started. I know my few cross stitching friends at the time dreaded checking their emails because I had so many questions so if anyone ever has questions I might could answer, I’m happy to help. I remember needing help and being so grateful for the answers to my questions.
Remember also that we’re all different and like different things. As always, I’m happy to share my preferences.
The Materials:
Charts:
There are printed charts, as well as PDF charts available. I would use only PDF charts if it were up to me but not all charts are available as PDFs.
Floss:
I’m a lover of all floss. I do love silks. Vikki Clayton Silks are the ones I order most. I love her service. She’s super quick to ship and I like her. I like all the silks I’ve tried. I like DMC. I like the overdyes. But I can’t remember any floss I’ve tried that I will never use again. One thing I’ve learned that I wish I had known when I first started – when a chart calls for overdyes, if there’s just a little bit of stitching or if the variegation isn’t going to show up, I now use DMC (most charts will have a DMC conversion). In my opinion, there’s no need to pay extra for the overdyes if DMC will give the same result.
Try it all. Get a small red work type chart with one color, buy a floss you’ve never tried and use that (doesn’t have to be red). That’s an easy way to try out different flosses without having to buy a dozen or more colors.
Fabric:
Choose linen, lugana, Aida – whatever you like. If you aren’t sure what you like, try it all and then decide. Even if you love what you’re using, try something else. You may like it better.
How do you follow a pattern? Do you do one color, then another, or do you change colors every line? And do you mark it off the pattern once its finished? If I mark the pattern up, I feel like I can’t pass it on or use it again!
The Procedure:
Fabric Size:
I use linen so I’m not sure about Aida but the quilter in me cringes at how crooked most linen is cut. Most will recommend leaving 3″ on each “margin”. I usually leave about 3/4″ border and figure I need about 1″ for framing. If you’re sending your pieces out for finishing, your finisher will let you know how much space they require. I’m happy with 2″ total between the stitching and the edge of the fabric but first . . pull a thread. I’ve lost as much as 1-1/4″ on each side from horribly crooked linen. Pull one linen thread from near the edge. You may “run off the edge” and have to pull another thread a little farther from the edge but eventually you’ll get one that goes from top to bottom (or side to side), then cut it along that line. I serge the edge but if you don’t have a serger, you might could zigzag that edge.
Getting Started:
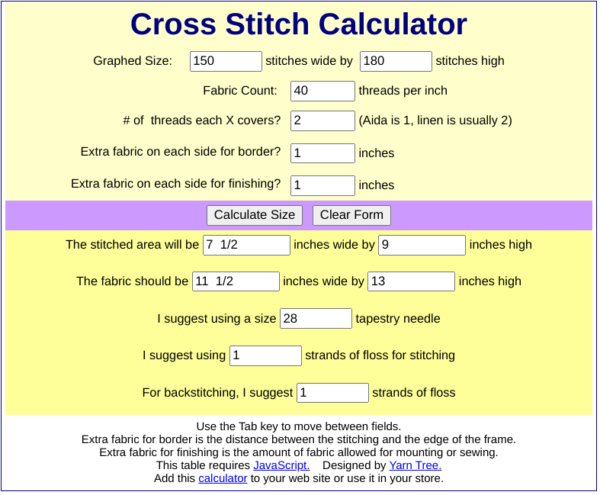
I always, always re-check the size to be sure it’s all going to fit. Charts should say the stitch count – something like 150 x 180. I use this calculator.

This tells you the size of the stitched area as well as the size the fabric should be if I’m using 1″ for borders and 1″ for extra fabric on each side.
You can start at any point in the chart. Most will recommend, at least in the early stages, that you start in the center. The chart should have the center marked. Fold your linen in half. You can mark (maybe with a scrap piece of thread) the halfway spot horizontally, vertically and the center.
Some will start in the very center. Some will start on the top or bottom center. I prefer to start on the top right. I will measure 2″ from the right edge and 2″ from the top and that’s where my corner should begin. If there are no stitches right at the very corner, count those stitches, then count that many squares (remember to count two holes for each stitch on linen), and that’s where you will begin.

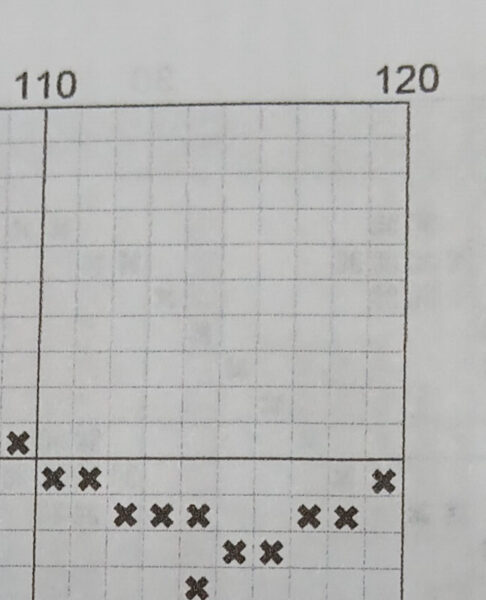
Example: The chart shown above, the first stitch would be that one on the far right at the top and I would start it right on the spot where the right side stitched edge should be but it would be on the 11th square down from the top. Make sense?
The Order of Stitching:
There are all kinds of ways to do it but I will usually stitch the border first.

From there, I start filling in the chart (top right to top left). Usually the last thing I do is go back and do all the work around the border (vines, flowers, etc.).
I do try to work in sections. I’m not that great at counting so I’ll usually stitch over to something. Say there’s a tree sitting kinda out in the middle of a space but there are flowers between the tree and the house. I will stitch at least the outline of the house, then the flowers, then the tree so I don’t have to count 80 stitches over to get to the tree. Make sense?
I try to do as much as I can in one color but sometimes, I do have to stitch just a few stitches in one color, then move on to another color.
There’s no right or wrong way as to how/where to start – try different ways and see what works for you.
Keeping Track:
I always make a working copy of the chart. I have a small storage bin designated for “works in progress”. The original chart goes into that bin. The copy goes into my project bag. If I work from the paper copy, I will use a highlighter and mark offer the stitches as I stitch them.
I use the Markup R-XP app for stitching and I love it! I can easily make a pdf of a paper chart using my printer. The app makes it so much easier to “highlight” the stitches I’ve made. I highly recommend this app. I believe there is a trial period where you can use it before paying for it.
My Recommendations:
Keep track of everything!
- Floss you used – especially if you changed any of it.
- Fabric used. In the beginning, I thought — I don’t care what linen I used but after stitching, there have been several times when I know I don’t want to use that linen again or a couple of years later when I want to stitch something and I want to use the same linen I used on a certain piece and have no idea what it was.
- Any changes you make to a chart. Sometimes I will think there needs to be fewer spaces between the house and the tree on the right side; then I get to the left side and forget that I did that. I wrote this post about the little notebooks that I keep in each project bag. Every day when I start to stitch, I check the notebook for the project I’m working on, even if I’m 100% sure I hadn’t made any changes. I’d rather spend 20 seconds checking, than miss something I should have noticed.
Other ideas:
- In the beginning, don’t tackle a project that’s too big or too difficult. Stitching may seem frustrating or hard at first. It did for me and I had stitched 20+ years ago.
- Find a stitching buddy or group. I’ve only had online buddies but they’ve been great when I needed an opinion or needed help. There’s a local shop about half an hour from us and about 10 of us get together once a month and stitch and I look so forward to that.
- Don’t be afraid to try something new. If you don’t like it – you can either grit your teeth and finish it or rip it out and reuse the fabric for something else. I almost didn’t finish the current project because I didn’t like the rice stitches when I first made them but now that I’ve gone back to it, concentrated on getting them made correctly, I love them!
- Flosstubes and Instagram are great sources of inspiration for not only charts that you may want to stitch but finishing ideas.
Hopefully this helps a bit.

Diane Kummelman says
Great info, Judy! Thanks so much. Especially the one about making a copy of the pattern, never thought of that! Thank you!!!
judy.blog@gmail.com says
Glad to help. Any time you have questions, post them here and hopefully someone will respond with a great answer.