The other day I was asked by a reader to show how I prepare or get ready to start a new project, specifically New Year Sampler, which some of us will start on Christmas Eve. For this post, I will use New Year Sampler as my example.
Choosing Fabric:
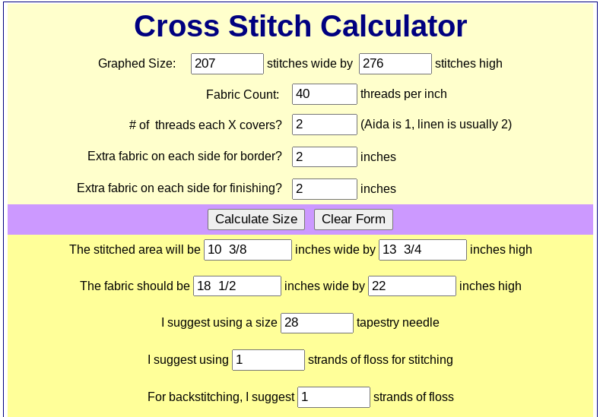
The very first thing I do is find the page in the chart that shows the size, which is number of stitches across and number of stitches up and down. For New Year Sampler, the chart is 207 x 276.
Next, I will put that info into a cross stitch calculator. The one I use is from Yarn Tree. Usually on the same page, it will say which fabric was used for the model – the count and the color. This particular one used 32 count Light Mocha by Zwiegart and the stitched size would be 13″ x 17-14″.

I will use either 36 count or 40 count. My preference is probably 40 so my finished stitch size will be 10-3/8 x 13-3/4.
Next, I will go to my 40 count bin and see which linens I think would look amazing for this project. I know from the calculator shown above that if I want 2″ on each side for the “border” and 2″ on each side for finishing, I need a piece of fabric that’s 18-1/2″ wide by 22″ long. Really, I don’t worry about which side is “long” and which side is “wide”. I know some say it matters but I haven’t found it to make a lot of difference so I turn the fabric whatever way it needs to go to work.
Also, I do my own framing and if I end up with 2″ on all sides, I’m pretty happy. It all depends on how much space I want to leave between the edge of the stitching and the edge of the frame. I’m 100% ok with having 1″ for finishing.
Note: Be sure the fabric is straight! I always decide which already cut edge will be the edge I keep and I pull a thread to make sure that edge is cut straight. If it isn’t and it goes in 5 or 6 or 10 threads, you’re going to lose a lot of fabric and it matters if you’re cutting it close.
So . . I go to my 40 count bin and pull out some fabrics and make sure they’re as big as I need for them to be. Then I bring them to where I can spread the floss out on them and make sure the floss is going to work with them. Remember that with most floss, it’s 6 strands and when I pull out one strand for 40 count, it may not look the same as it looks when there are 6 strands together. If any of the floss looks questionable . . like it may blend and not show up, I’ll separate out one strand for a few inches and then see what I think. Also, I’ll look at the chart and see where that particular color is going to be stitched on the fabric. Say I have a peach colored fabric and a tan floss and the tan floss isn’t going to show up, but it’s only used for a bird’s foot but the bird’s foot is clenching a tree branch so the only place that tan floss is used is against a brown tree branch, it will show up fine. Had that tan floss been going to be used against the peach fabric, I would have changed it to something darker.
Deciding Where To Start Stitching:
As far as I’m concerned, there’s no right or wrong way. Some start at the bottom and work their way up. They may start at the bottom right, or bottom center or bottom left. When I stitched years and years ago, I was taught to start in the center and I did. I see the value of that IF you don’t have a cross stitch calculator. If I know exactly how many stitches there are from left to right or right to left and how many there are from top to bottom or bottom to top, I should be able to know exactly how much space I’m going to need.
My preference is to start at the top left. For the most part, I start there and work my way across and down. I don’t often skip around. On A Changed World, I did work the entire outer border so I had reference points and was able to do a little bit of skipping around. That’s risky for me and not stitching things in the order that I see they should be in kinda makes my head spin.
For New Year Sampler, I would start in the top left.
By now, you should know how much finishing edge you’re going to leave, as well as how much space between the edge of the frame and the edge of the stitching you want to leave. Measure that amount . . for me, since I start at the left top, say I want to leave 2″, I will measure 2″ from the top and 2″ from the left edge and put a mark. I usually thread a needle with a piece of leftover floss (it’s always laying around on my chair), come up with that floss and then down as if to make half a stitch and just leave it hanging like that.
Next I count any stitches I’m NOT making that are between where I want to start stitching and the marked spot where my stitching edge should be. Sometimes, for reference, it’s easier to start with one thing vs. something else. Say there’s a flower on that left top and I want to start stitching the stem. I will count the number of stitches that extend to the left and above the stem where I will start stitching.
Example: I’m going to start with the stem but there are 6 stitches to the left of the stem and 5 stitches above the stem. I will count to the right 6 stitches (which with linen will be 12 thread) from my thread marker and I will count 5 stitches down from where my thread marker is and that will be where I make my first stitch. Once I’ve made a few stitches I can remove the thread marker or if you’re more comfortable to stitch the stem, then go back and stitch the flowers and make sure it’s all lining up before removing the thread marker, that’s ok.
Managing The Floss:
Again, this is purely personal preference. For me, because I lose everything, I have to have a plan and stick with it.

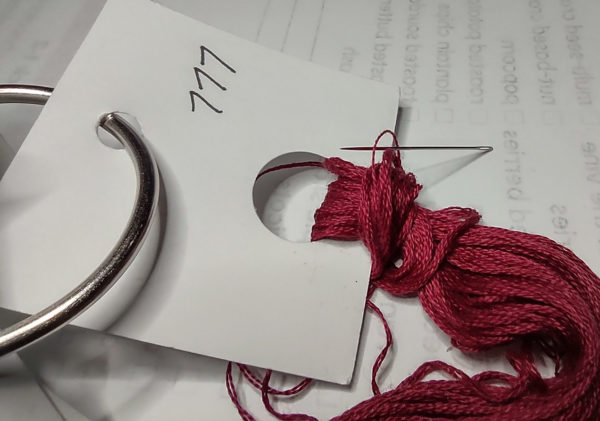
- DMC – I put this on floss tags. Since I almost always use single strands, I cut the floss to 18″ lengths and hang it on a heavy paper tag. With all of the floss on tags, I can separate one strand easily as shown above.
- Weeks, Classic Colorworks and Gentle Arts all come on tags so I leave them as they are and cut the curved edge of the floss at the bottom to make it into 18″ lengths.
- Silks – Those that come in skeins, I put them in individual plastic bags. When I cut a length, I pull out the one strand I’m going to use and put the remaining strands in the bag with the skein.
- Victoria Clayton Silk Bobbins – I will either put them in individual plastic bags or I will cut an 18″ length, pull out one strand to use and put the other strands on a floss tag.
This is getting long. I’m going to end this post and I’ll do another one later today or tomorrow and include auditioning floss/fabric and actually making those first stitches.

Christina says
Hi Happy to join you Judy, I am waiting for my floss and have a few pieces of linen waiting till I see the colours on it. I see there are a lot of white stitches , so I want to see the white which means I may go a shade darker linen than normal. Have been looking at the chart and plan to complete sections at one time. Like you I start top left and go from there. Feeling excited about this project. and was delighted to see your ideas about it and looking forward to starting, while my husband will be incapacitated with a knee op on Dec 23rd! Quiet Christmas for us.
Christina says
hi , i was always told to have the selvedge end on the vertical, it avoids distortion? Not sure if this is for real, but I always try to keep the edge vertical. Just a thought
judy.blog@gmail.com says
I try to keep it on the vertical but when it ends up being horizontal, I don’t see any difference.