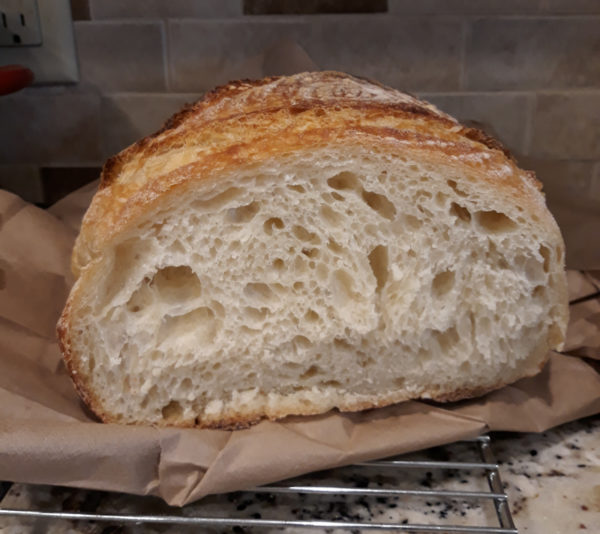
Instead of posting a bunch of step by step photos, I’m going to link to the instructions on the Sourdough by Foodbod site. She says it all better than I could; I’m using her recipe.
Sourdough by Foodbod’s instructions for sourdough.
Because I think the time frame and figuring that all out is important and can be confusing at first, I’m going to give the timeline that works for me. Feel free to change your start time but you need to keep approximately the same time frame. My kitchen stays pretty cool. We keep the a/c on 69 most of the time and the a/c unit is in the attic above the kitchen so the kitchen actually gets the most air. You may need to adjust your time frame a bit depending on the temp in your kitchen.
One bit of advice: Follow the recipe exactly at first. Later, you’ll know if it needs a bit more flour or a bit more water. I’m always tempted to add more water and usually end up with a sticky dough.
These times are approximate. Once you start making the bread several times a week, you’ll surely want to adjust some of these times based on your schedule and how things are working in your kitchen.
10 a.m. – Remove the starter from the fridge and let it come to room temp.
Noon – Feed the starter.
3:00 p.m. – Check the starter. Is it bubbly and active enough? If not, you may want to put off your bread making til the next day and give the starter another feeding. You’ll come to know your starter and how it reacts. If the starter is ready, take out the 50 grams needed for the bread, put the rest back in the fridge.
2:00 – 4:00 p.m. – This is ideally when I mix up my dough. It will be a bit shaggy. Resist the urge to add more water at this point.
5:00 p.m. (or one to two hours after the dough was mixed) – Do your first lift and folds. The instructions are on the Sourdough by Foodbod site and she has links to videos.
6:00 p.m. – Do another set of lifts and folds (not so many this time – follow Elaine’s directions).
7:00 p.m. – Do another set of lifts and folds.
7:30 p.m. – Do another set of lifts and folds.
8:00 p.m. – Do another set of lifts and folds.
Cover the dough and leave it sitting on the counter overnight.
The next morning:
Follow Elaine’s directions to get the dough into the banneton. Place it in the fridge and leave it 3 – 24 hours.
Once you’re ready to bake the bread, she has instructions for baking it in a preheated oven or not. I have much better luck placing cold dough in a room temp pot with a room temp lid in a cold oven. Using Elaine’s recipe and a 3.5 quart ceramic glazed Dutch Oven with a lid, I bake it at 460 for 50 minutes, remove the lid and bake another 10 minutes, then remove the pot from the oven, let it sit about 5 minutes, then remove the bread to a rack to cool.
I’ve also found that cutting the bread before it’s completely cool can make the crumb/texture a bit chewy/gummy so resist the urge to cut it right away. Let it cool completely before cutting.

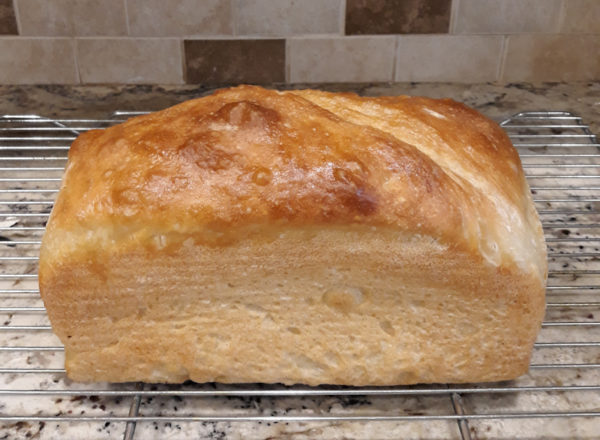
Loaf Bread:

If you want to make a loaf of bread, I use the exact same recipe as far as amounts. I let the dough sit out all night but the next morning I shape it into a loaf, put it in a greased loaf pan, cover it and let it rise til the dough is near or at the top edge of the pan.
Preheat oven to 425. Bake at 425 for 20 minutes. Reduce heat to 375, then bake for about 30 more minutes. I like my internal temp to be about 190 to 195.
King Arthur has an excellent article about the temp at which bread is done.
Experiment. Have fun!

Deborah K Kuykendall says
Judy, Thank you so much for sharing your process. I’ve watched countless youtube videos and read so many blogs. My head is spinning. I made sourdough bread back in the 70s and I didn’t recall it being so fussy. I guess I didn’t know better or knew to be intimidated when I had just one library book to read about sourdough. Anyway, I was feeling paralyzed by all of the new information and schedules that seemed difficult to fit into having anything else that needed to be done in a day. I hadn’t found the Foodbod in my research. It was helpful and seems to have directions that are more forgiving. I was beginning to think I had adopted a newborn with all of the prescribed steps on other sites! Thanks for the info. My Judy (my starter) and I are in the midst of our first bread loaf adventure. I think it is far too wet but we shall see.
Judy Laquidara says
I hope it works but you know it WILL work, even if the first load isn’t the best. You will be surprised at how easy it all becomes after the third or fourth attempt.
Deborah says
I will be baking my first loaf this evening. I’m so excited! It looks beautiful if I do say so myself. I don’t have a banetton as it appears to be coming from a slow boat from …..china. Literally. Evidently every banetton already has a home in someone’s house in the US and while the location of where made wasn’t disclosed, I’m betting China or India.
Thank you for mentioning the cold oven option. I didn’t find that in her directions but I must admit I have trouble finding the recipes on her site. Maybe it is my web browser blocking something. I wind up going to her youtube and backing into the recipe on her site from the link. I did hear her say in a video putting her loaf in a cold oven but no other information on that. I’m going to try your approach with cold oven, room temp pot and see how it turns out for me.
Thanks for sharing your experiences.
Judy Laquidara says
To me, putting it in the room temp pot, cold oven is so much easier because it never landed in the hot pot just right and then I couldn’t move it and I was so afraid I was going to burn myself. Let me know how it turns out.
I’m sorry you’re having trouble finding things on her website. I think it’s so easy to find things.
Judy H says
I’ve never tried a sandwich loaf before – do you use a standard size loaf pan? Do you cover it somehow?
Judy Laquidara says
I covered it while it was rising but not while it was baking. Good questions! I used a 9″ Pullman pan. I only have a 9″ and a 13″. I wish I had an 11″ but yes, any bread pan should work. My loaf in the 9″ pan got kinda tall. I’ll probably try a longer pan but not as long as the 13″ next time.
Judy H says
Thanks! I did a search and I see that some people put another loaf panupside down on top as a lid. I only have one, so that isn’t an option at the moment. I’ll have to try a loaf soon and see how it turns out!
Deborah says
One thing I noticed is that foodbod recommended different temps if baking convection vs. conventional. Since I’m going to follow your temp for cold oven start, are you putting it in convection or conventional?
Judy Laquidara says
Good question. I’ve often wondered why she says that. First, according to what I’ve read, convection isn’t always best for bread. https://www.thekitchn.com/whats-a-convection-oven-and-when-do-i-use-it-appliance-guides-from-the-kitchen-216549
I will use convection to brown the top once I know the bread is done but not necessarily as brown as I want it.
Second, I’ve always been told that cooking with convection doesn’t make much difference in high sided pans or when using lids so, to answer your question, I do not use convection unless it’s for the final browning.
Deborah says
I didn’t know that about convection cooking. That’s good to know. Thanks!