There are many ways and methods of making sauerkraut. I am not an expert at anything, especially kraut making but I know what works for us. For anyone wanting to get started making kraut, and it can be hard to start some new project like this, and even harder when it’s something you’re going to leave sitting on the counter for days or weeks or months and then feed your family.
Let’s just start at the beginning.
Fermenting Vessel:
You are going to need something to use to ferment the cabbage. It can be small or huge.
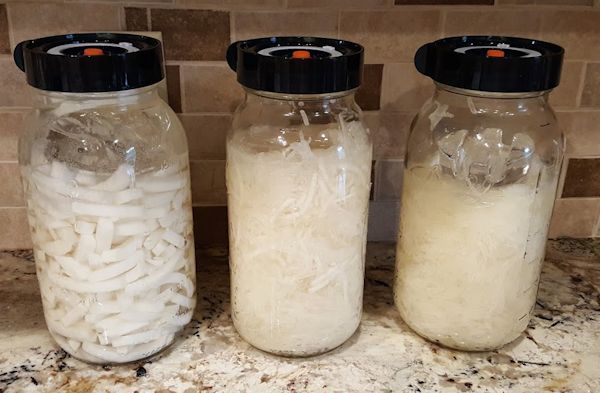
A Mason jar will work just fine. I recommend a wide mouth quart for starters. A fermenting lid and a weight makes the job much easier. I like this lid because it has a dial type gizmo on top and you can turn it to the date you started the fermenting process. I find it easier to clean than a plastic nipple type lid. You will also need a method of weighting the cabbage to keep it beneath the liquid. I love these glass weights. There are sets that contain fewer than 7 but for the cost, this is a good buy. Be sure to buy the correct size fermenting lids and weights! (wide mouth if you’re using wide mouth jars).
Pros to Mason Jar method:
- Inexpensive and jars can be used for so many other things if you end up not enjoying making the kraut.
- Can be made in small batches.
- Several jars can be made at once and you can begin enjoying a jar as soon as it is tart enough and let the other jar(s) wait to test the effect of longer fermentation.
- It can be stored in the fridge right in the fermenting vessel (jar), with a tight fitting lid.
Cons to Mason Jar method:
- Not the best for huge batches.

Shown above are turnips being fermented and this is the blog post about those.
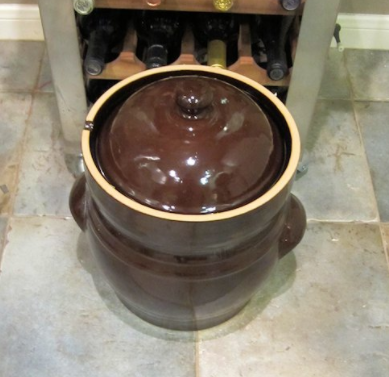
Probably most well recognized for kraut making are crocks and they can be large/huge or small. When I had a basement, I’d use a very large crock with a lid that sits in a “trough” of sorts. Water is poured into the trough to form a lock so gases can escape but harmful bacteria/dust cannot enter.
Some crocks are just the vessel without the lid and other methods of covering are used. I’ve never used this method so I can’t say what type of cover is recommended or how well they work to keep out dust/bugs. I live in Texas and bugs and dust are always an issue.

Shown above is a smaller crock and it will hold 8 – 10 heads of cabbage. You can see the trough around the lid where water is kept as a “seal” to keep out the bad guys but let the gas escape.
Pros for crock method:
- Can make large to huge batches, depending on the size of the crock.
Cons for crock method:
- Crocks are big and heavy. For those of us in small houses, there needs to be a good, out of the way place to put it and it helps to have someone to help shred and pound the cabbage, as well as move the crock.
- These can be quite expensive if you purchase new.
If you’re going to be using more than 4 or 5 heads of cabbage at a time, you may also want a cabbage cutter. These are usually long wooden or plastic rectangles with a blade in the middle and the cabbage slides across the blade to cut it. I have one but it’s a bit of overkill, and there’s usually at least one bleeding finger when using it so I most often use a knife and a cutting board.
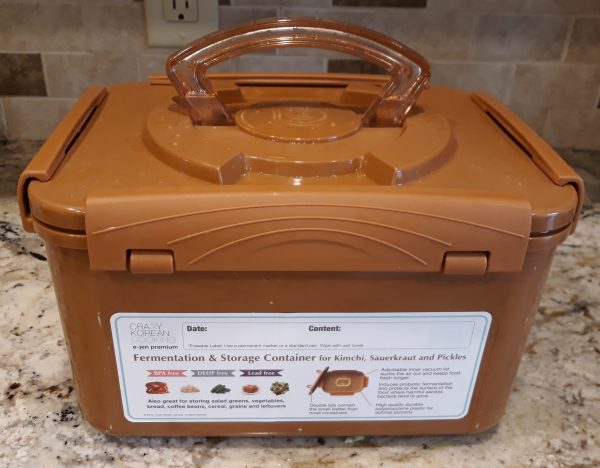
My favorite method for making kraut is in the fermenting box. There are several varieties of these on Amazon but the one I use is the Crazy Korean fermenting box.

The one I use is a 1.3 gallon box and it will easily hold 4 heads of cabbage. I love this one for so many reasons.
Pros of fermenting box:
- Lightweight/easy to store
- Easy to clean and not heavy to handle
- Portable – if I start a batch of kraut and find I need to go to Louisiana or Missouri, I can take it with me easily
I really can’t come up with any cons for this method. It doesn’t look traditional. Those with grandmas who made kraut . . they probably would not approve.
All in all, I’ve made kraut using all three of the methods shown above and the kraut tastes the same to me, no matter the method used . . it’s simply fermented cabbage.
There are other methods that can be used; these are the three methods I’ve used.
Ingredients Needed:
It’s pretty simple – cabbage and non-iodized salt. Some prefer fancy sea salts. I generally use canning salt because I always have it on hand.
The quality of the cabbage matters. Get the freshest you can find; homegrown is always preferred. Once I couldn’t find beautiful cabbage and ended up getting some that looked a bit sad. It was dry and tough and no amount of pounding causing it to release any liquid, because there was no liquid. So . . look for fresh cabbage.
Step by Step Process:
I find it easier to work with small batches of cabbage and then mix it all at the end.
- Remove the outer leaves of the cabbage . . as many as needed to get to tender, fresh looking leaves. Save the leaves you have removed and use those on top of the shredded cabbage to help keep them submerged.
- Cut the cabbage in half, then into quarters.
- Remove the core.
- Rinse until confident all grit has been removed.
- Begin slicing. Slice consistently then. It doesn’t have to be paper thin but as thin as you can get it. Mine isn’t always terribly thin.
- Here’s where I generally work with half or 3/4 of one cabbage at a time.
- Weigh the cabbage. For each pound of cabbage, add 2 tsp. of salt. Too little salt and it may mold before fermenting; too much salt and the fermentation process may be inhibited. Some say 2 tsp. is too salty and they use 1-1/2 tsp. I use 2 but you may want to experiment with 1-1/2 to 2 tsp.
- Sprinkle the salt over the cabbage and pound it (not gently but not too aggressively) with a cabbage pounder or anything that will bruise it. I start out using my hands but they get tired before the cabbage is done and then I use the plastic “plunger” that came with my Vitamix.
- Place the salted, massaged cabbage in a large container and continue adding additional salted, massaged cabbage til all the cabbage is processed.
- Cover loosely with a towel and let sit for about 45 minutes.
- Give it all an additional massage and let it rest until enough liquid and been released to cover the cabbage. Sometimes it doesn’t look like enough but when you mash it down, the liquid rises.
- Place the cabbage and the liquid in the fermenting vessel and proceed according to the directions for your chosen method. Make sure there’s enough liquid to keep the shredded cabbage covered! For jars, I pack the cabbage in tightly, place a clean cabbage leaf on top, place a weight on top and screw on a fermenting lid. For a crock, a place several layers of leaves on top, then the weights, then the lid and fill the trough with water. Check the water level often during the process and keep it full. For the fermenting box, place the flat lid with the hole in it on top of the cabbage, mash down til some of the liquid escapes. In the first few days, I cover the hole with the top but after there’s sufficient liquid, I leave that first lid uncovered. Place the top on and snap it shut.
- Wait til it’s done!
How Long for Fermentation:
The length of fermenting time depends on the temperature at which it’s fermenting and your taste. There’s no harm in checking it after 4 or 5 days. The colder the temp, the longer it will take. I’ve had it seem ready after 10 days and I’ve had it not seem ready til after 6 weeks or more. I’ve never lived in a very cold climate so my fermentation is usually on the shorter side.
Storing:
This is where a lot of people differ in their opinions. I don’t know who is right, nor do I care. Figure out what’s best for you and your family.
Back in my grandma’s day, they had no choice but to make it when the cabbage in the garden was ready and they made it once a year. Now, most of us are buying cabbage at the grocery store and while there are times when the cabbage is fresher than other times, we can almost always find good cabbage in the stores if we live where we have good grocery stores.
Some will can the kraut using a water bath canning process. Info on that process can be found here.
I do not can mine because I feel the heat destroys the probiotics. I simply put a tight fitting lid on it and stick it in the fridge.
How Long Does it Last:
This is a good article, though it speaks more about storebought kraut. There are many good articles online about the shelf life of sauerkraut stored in the fridge. Six months seems to be the consensus, though many, including myself, have no problem with kraut stored in the fridge, unopened, for a year or longer.
As long as the kraut is stored on the counter, whether in a fermenting vessel or tightly sealed, it is going to continue to ferment and get more sour. Once placed in the fridge, the fermentation does continue but at a very slow pace. Kraut placed in the fridge today will almost certainly have a bit more sour taste than that same kraut six months from now. Still good but a bit more sour
A Word of Caution:
Mold can form . . even on a fermented food. There are good yeasts that appear as a mold, and bad molds but I am not knowledgeable enough about them so anything that looks weird . . the whole jar is getting tossed. Not worth the risk, in my opinion.
Additional Resources:
This is an article I did several years ago with several recommendations for books about fermenting.
If you love kraut and have never had homemade, stop right now, go to the store, get the stuff and make a small batch. One head of cabbage and a fermenting lid/weight/Mason jar . . not a huge investment.
We use it with hot dogs, reuben sandwiches, eggs, mashed potatoes, just as a side dish. Check out this site for some ideas.
Growing up, we never ate kraut. I’m not sure if I ever tasted it before I was 40 years old. Then, I felt like I had to put a little of it on hot dogs just to be “normal”. Then I wanted more on hot dogs, then I tried it on mashed potatoes because my friend in Kentucky had a German husband and she taught me all about it, and then I made homemade (vs. the kind in a can). I was hooked. Now, I’m probably a bit addicted to it and when I go to MO for a week or more, there’s always a jar of kraut in my cooler.
Try it . . you might like it!


Pat says
When I was a kid I lived on a farm. Kraut was always made when the cabbage came in. My mother put the cabbage in a churn and after the weight (which if I remember correctly was a wood disk) the churn was cover with a clean dish towel and tied . Loved sampling the kraut as it age. Good memories
dezertsuz says
Wow, Judy, what a resource! If I ever decide to make my own, I will know right where to come for the best directions.
Tina Zee says
When you put the cabbage in the fermenting pot, do you also pour in the liquid that the cabbage released? You make me want to try this because we love kraut and mil mil used to make it. She stored hers in the freezer.
Judy Laquidara says
Yes! The liquid absolutely goes in and there needs to be enough liquid to keep the shredded cabbage covered. I’ll go back and clarify that. Thanks!
Tee says
When I first moved into my rural community from the “big city”, I asked a neighbor if he had ever made kraut. Of course he had, but had not done it for years. He was kind enough to give me his cabbage cutter and his masher, which was a baseball bat! I still have both, but don’t use either, as like you, it is just as easy to use a knife and I don’t make enough to use a bat to mash it. I use a 5 gallon plastic bucket, with a garbage bag filled with water on top to seal it when I want to do a big batch and use a mason jar when I want to do a small batch.
I have heard that even if you heat up the kraut to eat it, the probiotics will die, so we sit it on the counter to get to room temp when we are going to eat it with dinner.
Beryl Redfield says
Hi Judy, you convinced me to get the crazy Korean fermenting box from amazon. Just need to get some fresh cabbage although I have a head that’s been in the fridge for a month when I was going to make runza. I think it’s strange there were no directions that came with it, so I’m going to follow yours that you posted a few days ago. I have done this once before, in a mason jar which was real good. Hoping for a good result! Thanks!