What happens to your quilt design when you just cannot get the borders to be the size you need them to be for adding pieced border blocks? Example: You want to add 5″ border blocks. The top and bottom, as well as the side borders, just before the pieced border would have to end up being a multiple of 5.
Here’s a good spot for a shameless plug. If you want more border info, check out my 60 Pieced Quilt Borders book. It’s available at Amazon. Not only are there instructions for borders but there are instructions for figuring out the sizes you need for your borders to be, and how to make borders fit your quilt.
OK! It’s been a while since I mentioned my books so . . now we can get on with the blog post! 🙂
There are probably multiple ways to do it but when working with Electric Quilt, this is how I do it.
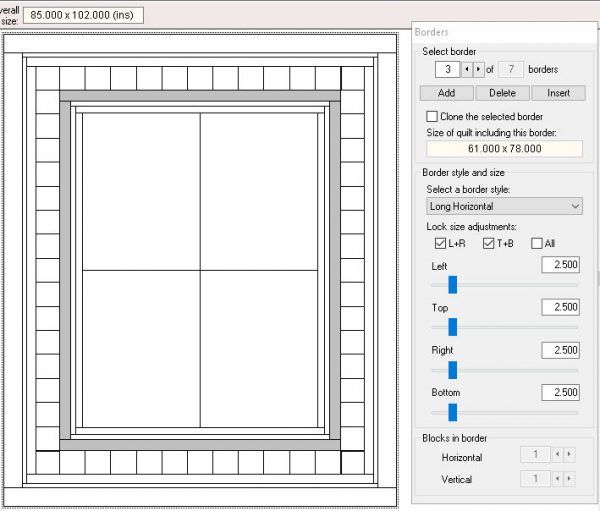
This is Addie’s layout. The pieced border, #4, is made up of 5″ finished blocks. I would need border #3 to be a multiple of 5 for this to work out. Sometimes I can easily get them to work out and sometimes I can only get one, and sometimes I can’t get either of them to work out.
In this case, there’s a blank square in between the pieced squares. I can make those blank squares all the same size, but a bit larger or smaller (and then they wouldn’t really be squares but let’s not get technical!), or I can just make the two end blocks different.
For Addie’s quilt, I’m going to make all the blank squares the same size. Here’s how I figured it. If you want to throw your hands up and say “I hate math” . . that’s your choice, but it’s really easy and just a few simple steps.
- The side borders need to be 78″ finished.
- 78 divided by 5 (because I’m using 5″ blocks) = 15.6.
- I need an odd number of blocks so I will use 15 blocks on each side border.
- That means I’ll have 8 plain blocks and 7 pieced blocks.
- The pieced blocks are going to be 5″ x 5″. No way to easily fudge on those.
- 7 pieced 5″ blocks = 35″.
- 78 minus 35 = 43.
- Those 8 remaining blocks must equal 43″.
- 43 divided by 8 = 5.375 (or 5-3/8″).
- Add the 1/4″ seam allowance for both sides = 1/2 inch = 4/8.
- 5-3/8″ + 4/8″ seam allowance = 5-7/8″.
- I will cut the plain blocks 5-1/2″ x 5-7/8″.
- 8 blocks that finish at 5.375 = 43″.
- 7 blocks that finish at 5″ = 35″.
- 35 + 43 = 78.
Pretty easy, wouldn’t you say? Maybe it takes more than just a few steps but really, it took me longer to write that out than it takes to do the math. 🙂


Ruth says
This means that each of these solid blocks will be barely 1/4″ longer on one side than the other. Having worked with blocks this size, I can tell you that you need to be very VERY careful which side of the block you attach! Because if you use the “short” side, the strip will be too short, and you will curse (politely) under your breath. Then the seam ripper will come out and as it works, you will wonder how to keep from doing the same thing again and again. Maybe if there was a faint directional pattern in the block and they were all cut facing the same way….
Glenda says
I never realized a degree in engineering or math would come in handy for quilting! If people realized what goes into these quilts, they would be traded on the stock exchange. Oh well, most “women’s work” is like that.
I don’t aspire to making such a complex quilt but I do admire and respect what goes into it.
Tricia says
That’s a lot of math first thing in the morning, Judy! You should give a warning in the title of your post–like you do for some of your scary/yucky bug/spider/snake/rodent posts!
Linda Enneking says
Thanks for sharing how to do this. I would probably try to make the two solid borders the size needed to bring the edges to a number divisible by five. I expect it would take me a while to figure that out. I think I need to buy your book!