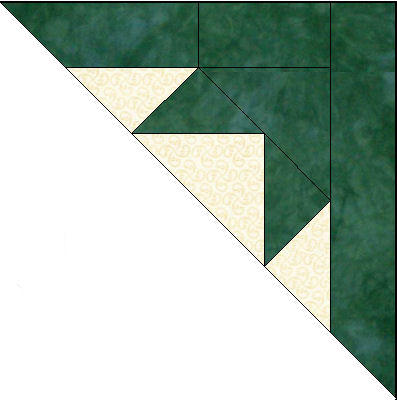
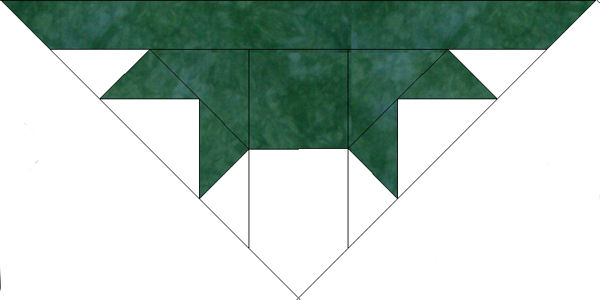
This is one of those segments where the words take forever and make these blocks seem much harder to make than they really are. These are the blocks we will be making.
We will be using Fabrics 1 and 2.
Step #1:
We’ll be making flying geese. These need to be 2-1/2″ x 4-1/2″ unfinished, or 2″ x 4″ finished. Use your favorite method to make these. I highly recommend the PatchPieces method found here. If using that method, for these, the background/geese fabric (Fabric 1 for us/A for the PatchPieces worksheet) would be cut 5.25″ and the sky (Fabric 2 for us/B for the PatchPieces worksheet) would be cut 2-7/8″.
24 flying geese are needed.
Step #2:
“Wings” will be added to the flying geese as shown. From Fabric 1, cut 24 – 2-7/8″ squares and cut those on the diagonal once to yield 48 triangles.
Step #3:
From Fabric 2, cut 6 – 5-1/4″ squares. Cut these on the diagonal twice to yield 24 triangles. Sew the triangle to the bottom of the unit as shown. Set 4 of these aside and continue working with 20 of them.
Step #4:
From Fabric 1, cut 10 – 3-3/8″ x 5-1/2″ strips. From Fabric 2, cut 10 – 3-3/8″ squares. Sew the squares to the strips.
Step #5:
Sew the units from Step 3 to both sides of the strip from Step #4, matching the bottoms (Fabric 2). We will trim the tops of the Fabric 1 portion. Now we’ll be working on 10 pieces to create 10 side triangles.
Step #6:
You can hopefully see my markings on the background strip at the top. You may find it easier to mark the center of the Fabric 1 strip, then draw the angle to be sure you have it right. You’re simply extending the side angles to create a corner.
Step #7:
From Fabric 2, cut 10 – 1-7/8″ x 19″ strips. Sew these to the bottom of the unit, allowing for the strip to extend past the piece so that it can also be trimmed.
Ta-da! Finished! Make 10 of these.
Step #8:
Go back to the four pieces left over from Step #3. From Fabric 2, cut 4 each: 1-7/8″ x 9-1/4″ and 1-7/8″ x 10″. Sew the shorter side to the piece, extending past the edge as shown.
Step #9:
Sew the longer piece as shown, again extending past the edge as shown.
Step #10:
Trim across! Done! You should have 4 of these!
If your January through July blocks are done, please share a picture. On Wednesday, August 6, I will draw for the winner . . who will receive a Stash Pack from Vicki Welsh’s Etsy Shop. When you need (or want) hand dyed fabric, please remember Vicki . . who sponsors this Mystery.


Kat Scribner says
I am a nut with borders, and I love that you create interesting borders for all your designs.
KT says
Love this! I’m loving this project–I’m all caught up, but not a blogger so no pictures. I’m confused about step #4–should it be 3-3/8 or 3-5/8″?? The rectangles have one dimension, and the squares have the other–just want to make sure I get the right size before I start cutting.
Thanks for this great project!!
JudyL says
So sorry. Thanks for catching that. It’s 3-3/8″ and I’ve fixed it. As always, please let me know if you see anything else wrong or questionable.
katie z. says
Intriguing pieces… I am definitely looking forward to working on this one!
Sue in OK says
My picture is #3 above – MSN.com in the title (was that way last month too?). I’m not sure why my name isn’t showing up in the title like everyone else’s – except maybe that I myself do not have a blog – but figure nah I’m probably just doing something wrong. Anyway MSN.com is Me Sue in OK 🙂
Thanks for all that you do – Love your site & making your quilts…not talented enough for knitting (I crochet – figure one needle is easier than two).
Sue