Main Tip: Read through the entire pattern . . word for word . . at least once before you begin. It will probably make no sense at all but once you get started, you’ll be glad you did it.
This pattern is so fun. I really can’t put it down. I won’t let myself pick it up until I know I have hours to knit because I cannot stop knitting once I start. When I read the reviews of this pattern, and I know many of you read those reviews, I almost changed my mind about making it. I am not an experienced knitter. I’ve knitted for a lot of years but I have never made a sweater. I avoid hard stuff. If you’ve ever trusted me about anything, please believe me on this. The pattern is so intimidating when you read through it but once you get started, it makes so much sense. The first feather may throw you for a loop. Once you get the first one done, it’s just amazingly easy — not easy in that I can knit it without paying any attention, and I can’t knit it without the directions in front of me, but it is just not hard or confusing once you get that first feather figured out.
TIP: If you make that first feather and you aren’t thrilled with it . . rip it back or, if you have enough yarn, cut it off and start over. My second feather looks so much better than does my first one so I’m really happy that the first one isn’t going to be part of my project.
Quilters .. do you remember when Bethany Reynolds’ Stack & Whack® first came out? Oh, my . . folks were flipping out about her instructions but once everyone calmed down, did step 1 before worrying about step 2, there is hardly a quilter out there who hasn’t made a dozen or more Stack & Whack quilt. This pattern is kinda like that. Do Row 1 before you concern yourself with Step 2. Finish Step 2 before you worry about Step 3.
Here are my tips. Read all the way to the bottom. I have tips shared with me by Teresa at A Quilt and a Prayer. Denise may have tips to add on her blog too. These are mine . . and don’t forget I’ve done three feathers so I’m no expert! I am writing these, which occurred to me in my limited knitting knowledge. Also, I’ve blurred out instructions when showing the pattern because I don’t want to cross the copyright line.
1. The designer recommends a crochet cast on. If you aren’t familiar with this method, I found this site helpful. I did not know how to do the crochet cast on. It is not hard.
2. If you are not familiar with the double stitch, I found this site helpful. I did not know how to do this and it is not hard either.
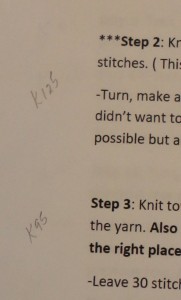
3. On my pattern, Page 16 is the page with the line instructions. I wrote the number of stitches I need to make alongside the written instructions beginning on page 7 on my pattern.
I found the written instructions quite helpful for the first few feathers because the designer tells you how many stitches should be remaining on that row or how many stitches before the double stitch, or after the double stitch, etc. Once I had a better understanding of what I was doing, I switched to the line instructions but still need to refer back to the written instructions some . . just to confirm that I’m doing the right thing. Example: Yesterday I was making 45 stitches and ended up stopping right at a double stitch on a row when I thought I was supposed to go 5 stitches past the double stitch. I went back and double checked with the written instructions and realized I had made a mistake and had to go back and find where I had messed up.
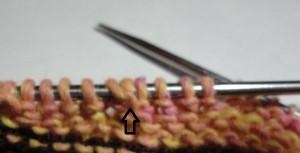
Example: For the rows you’re making where you should knit, stopping 4 stitches before getting to the double stitch. The black arrow points toward the double stitch so it’s obvious it’s different from your regular stitches.
4. At the top of my line instructions, I wrote “right” over the odd numbered column and “wrong” over the even numbered column.
5. Know without a doubt what the wrong and right sides of your work looks like. Keep checking to be sure if you’re working on the right side, you’re making an odd numbered row.
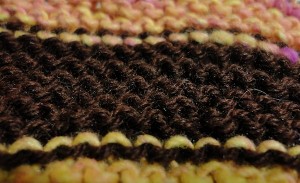
This is what the wrong side should look like with the back side of the stitches.
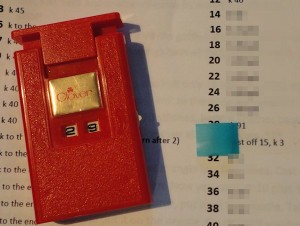
6. As you will see from Teresa’s tips below, she uses a sticky arrow to mark her spot. I am using a click type counter but I sometimes forget to click it and if it drops, it sometimes changes itself. I didn’t have any of the sticky arrows but I had some sticky flags so I’m using the counter and the sticky flag because I am so easily confused. I’m using the red counter but I also stick the flag over the row after the row I’m working on so there’s no way I can do that row without clicking the counter AND moving the flag.
7. For my first feather, I put the pins and markers everywhere the designer said to put them. I wasn’t quite sure why I was using them so now, I’m not using any markers or pins. In heresa’s tips below, you will see what she recommends with the pins and markers.
Teresa’s tips:
– stick with the line instructions on page 15 (16 on my pattern) and ignore the written instructions that come before, except to remember to always do the double stitch on each row of the feather. They did recommend reading through the steps just to get familiar with what she was trying to accomplish, but I have to say I did my first feather following those written steps and made a mess of that feather! I remade it using just the line instructions and it turned out perfect.


Donna Williams says
Thank you so much for all these tips. I said the other day I was going to study the pattern, but have I? Well, no. I have been SO busy (I could not tell you at what, but trust me I have not had a bit of trouble sleeping) I have not had a chance. These tips are going to be very very helpful, so they are very much appreciated. Also glad to hear it is fun – can’t wait for a spare minute so I can get started.
Mary says
I wrote “toward the tip” over the first column and “toward the stem” over the 2nd column. It really helps to reminded which direction you’re going.
On my Row-by-Row page (with just rows and stitches), there is NO row 71, which should read “bind off 10 st, K to end” (Edit added by Judy – please see Denise’s comment below — there is no Row 71 but Denise explains it all.)
After the first round, on all successive rounds, Row 01 should say “CO 25 Sts”
This is such fun!
Judy Laquidara says
There have been some recent updates to the pattern so please check to be sure your version is up to date. If you’re using the line instructions, please compare to the most recent version.
That’s a great tip about writing “towards the tip” or “towards the the stem” on your pattern. Thanks!
Denise - justquiltin says
Mary- there is no row 71 – what you are referring to as 71 is the new row 1 for each feather after the initial feather is complete. The row by row instructions explain above on that page that they are for the first feather and “start of” all subsequent feathers. So first feather starts at the top with row 1 and goes through row 70 – first feather complete. You can cross off the Row 1 and 2 instructions at the top of the row by row page since they are only used for the first feather and you won’t need them again after it’s done. After row 70 on the bottom of the row by row page is the new row 1 and row 2 (did your copy maybe cut those off so you couldn’t see them?) that starts all the remaining feathers. Just didn’t want anyone to think the instructions were missing rows.
Krista says
Reading the instructions beforehand was definitely useful, if confusing. I am following her written instructions (I prefer to “knit to 5 stitches before the double stitch” over counting every row). I’ve made 2 feathers, and ripped them both – first for colour, second for tension. Hopefully the next one will be the charm. In any event, I should be a pro at the feathers by the time I actually knit a keeper.