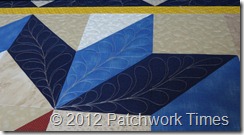
This is the section for today’s lesson. There will be a drawing video, and a stitching video. I don’t think there’s a whole lot for me to tell you other than what’s in the video.
I start at the bottom (right above that copyright symbol) in the center rhomboid (the lighter blue one in this picture). I make the spine towards the top. When making the spine, remember that the top of your spine is going to form the tip of your feather design. Then I come down one side make feathers towards the bottom, then go up the other side, making feathers towards the top, then I follow the spine line back to the bottom in order to not have to tie off, cut the thread and the start again. Once I come to the bottom, back to my starting point, I stitch over to the right or left (one of the darker blue ones), stitch it and then do the remaining one. Even though on the last one, I’m not trying to get back to the center to stitch another design, I still backtrack down that spine so they will all look the same.
Here’s the drawing video:
Here’s the stitching video:


Carla says
how do you keep a smooth looking line on the borders when you stop and start them with each advance of the quilt? I have an 18″ throat which gives me about 12 inches of quilt area and have always turned my quilts to get a nice line in the border. Thanks for your help.
Carla
JudyL says
Practice! Mine aren’t perfect either but once you get the feathers on there and wash the quilt, you’ll have a hard time finding the wobbles.
Know exactly where you’re headed so once you start stitching, you can get going without hesitation and that will help a little.
Angie in SoCal says
Judy, could you point us again to the two quilt tops you made for this set of lessons? I’ll go back right now and hunt for them, but I think it would be a great review (I know ours will look different) and helpful to have to link to those posts handy. Again, thank you for all your time and instructions.