First, let me apologize for how long it’s taken to get a new lesson posted. The camera battery went dead during the middle of making it. Plugged the camera in but the next day realized it was not plugged in all the way and had not started charging. Got it charged and it has honestly taken me three days to get this video to upload to YouTube. I thought I was doing everything exactly like I had done before. Finally, the video seems to be working. Tomorrow and over the weekend I will get the remainder of the lessons posted so that by the end of the weekend, you will have all my lessons. They will stay online for easy future access.
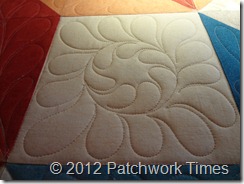
The feather wreath is probably the most difficult quilting on this top but it isn’t difficult at all if you take your time and draw on paper til you’re confident your stitching will look good.
This is one of the ones I did on the first Carpenter’s Star that I quilted. You will see that it isn’t perfect but when looking at the whole quilt, it doesn’t look half bad. The one thing I’d like for you to learn from these lessons is that when you star, up close and personal, with most any stitching, it isn’t perfect. From a distance, things that look so perfect, just aren’t. Please do the best you can do and don’t fret if your stitching isn’t perfect.
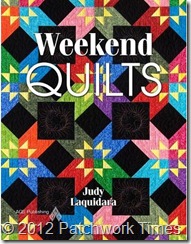
When I wrote my second book, all of the quilts were quilted and ready to send in . . except the quilt shown on the cover. I knew it needed custom quilting. Those black squares begged for feathered wreaths. Several times I came close to doing a panto because of the time crunch. Custom won out and I did those wreaths, on black fabric, using variegated thread. Every imperfection shows when using a colored thread on black fabric. When I saw that this was the cover quilt, I very nervously looked over these wreaths and hoped they were “cover girl” quality. They aren’t perfect but they aren’t bad.
Here’s a video of drawing the wreath. Spend some time practicing this.


Andi says
I agree…practice on paper! I usually dive right in, but my first fear wreaths were for a customer’s antique quilt. No way was I going to risk a first timer mistake! So, I used some old newsprint and the same template to draw a bunch of samples…then I put some practice fabric on the long arm and stitched four samples, THEN I loaded the actual quilt. Like you said, certainly not perfect up close but pretty good for most people taking a quick look. Thanks for the encouragement.
Andi says
LOL… They may seem like “fear wreaths” at first, but I meant feather wreaths.
Mary C in WA says
Nice plug for 3-M Company! You are making me want to put another quilt on my Quilt Table Tonight… I have one I want Feathered Wreaths on.
Erin says
thank you Judy..I will practice a lot on paper before I even try on my machine since I have never done this before!!
Donna says
Thank you Judy! I appreciate all you’re doing to post this class for us. I can’t wait to start on this when I get back home next week.
WiAmy says
Nice tips in that video Judy! Those extra marks would surely help. I knew that it would be really hard for me to freehand the wreaths (I’ll practice more in the future), so I did work one out on paper. I used the paper and scanned it to my computer to downsize it for the smaller squares. I transferred markings to the quilt and stitched on my marks! Even though I marked the feather wreaths, I am much more confident with feathers now! Thanks a bunch. Amy
Lori in South Dakota says
Enjoying your feather lessons very much. Your video is very good, your explanations are so clear and helpful. Thanks for doing them.
Pam C says
I missed this lesson and just found it by going to your calendar. It isn’t in the feather’s tutorial.
Do you have any tricks for the feathers inside the circle? I just can’t get mine to look nice. I think it has to do with the starting feather-getting it at the correct angle. The outside looks ok but the inside looks like sick worms!
Marilyn J. Smith says
“sick worms” is a good description! lol Maybe we are laying them down too much???
patti says
altho a family emergency prevented me from doing this project “with” you, today I made my first feathered wreaths on a comfort quilt. since it was on a 4patch, my reference points were built in!
first tho I used my clear acrylic dry erase board with a drawing of the block and references laid underneath. I probably did 20 or more over the course of the day, then a few more today and watched the video again before the real thing. not perfect, but very acceptable.
aacck! can’t scroll to pick up where I left off!…. I just wanted to thank judy for the confidence, encouragement, and tools to try something new.
thanx for giving me the confidence thru your tutorial
Jane in Austin says
Hi Judy, and Thank you very much for doing all the work to make the lesson possible. I’ve finished my quilt as of August 7, 2012 and am happy with the results.
Thank you again, Jane (from HomeQuiltingSystems Yahoo group).